
A torn tent fly can quickly turn a blissful backpacking trip into a miserable one, especially if bad weather rolls in. Your tent fly is your primary defense against rain, wind, and even sun, so a breach in its integrity can compromise your shelter and your safety. While a permanent repair will have to wait until you’re back home, knowing how to execute a quick, effective trailside fix is an essential skill for any outdoor enthusiast.
Assessing the Damage and Your Options
Before you jump into a repair, take a moment to assess the tear. Is it a small puncture, a clean rip, or a jagged gash? Understanding the nature and size of the damage will help you choose the best repair method. Also, consider the weather conditions – if a storm is brewing, speed is of the essence. Your goal isn’t perfection, but rather to restore enough functionality to get you through the rest of your trip comfortably and safely.

Essential Trailside Repair Kit Items
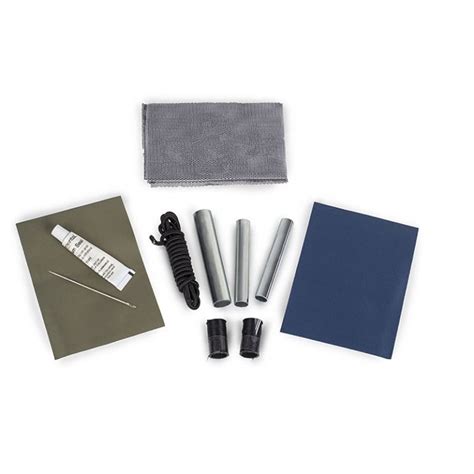
Having a well-stocked repair kit is crucial. Most of these items are lightweight and can easily be tucked into a small pouch. Here’s what you should consider packing for on-trail tent fly repairs:
- Tenacious Tape (or similar fabric repair tape): This is arguably the best and fastest option. It’s incredibly sticky, waterproof, and designed specifically for outdoor gear.
- Duct Tape: A classic for a reason. While not as specialized as Tenacious Tape, it’s strong and versatile for temporary fixes.
- Repair Patches (self-adhesive): Many gear companies sell specific patches for tent fabrics. Gear Aid is a popular brand.
- Sewing Kit (small): A needle, some strong nylon thread, and a few safety pins can be invaluable for larger tears or reinforcing tape.
- Scissors or Multi-tool with Scissors: For cutting tape or trimming frayed edges.
- Rubbing Alcohol Wipes (optional): For cleaning the area before applying tape, though not strictly necessary for quick fixes.
Top Quick Repair Methods
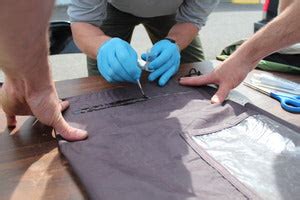
1. The Tenacious Tape / Gear Aid Patch Method (Recommended for Speed)
This is your go-to for most tears, especially small to medium-sized rips. It’s fast, relatively waterproof, and doesn’t require drying time.
- Clean and Dry: If possible, wipe down the area around the tear to remove dirt or moisture. A quick pat-down with a dry cloth or even your hand is often enough.
- Align Edges: Carefully bring the torn edges of the fabric together so they overlap as little as possible.
- Apply Internally: For best results, apply one piece of Tenacious Tape or a patch to the inside of the tent fly, covering the tear by at least an inch on all sides. This helps with waterproofing.
- Apply Externally: Apply a second piece of tape or patch to the outside of the tent fly, directly over the first patch. This creates a strong, weather-resistant seal.
- Smooth Out: Press firmly on the tape/patch, working from the center outwards to eliminate any air bubbles.
2. The Duct Tape Method (Reliable Backup)
Duct tape works similarly to Tenacious Tape but might leave more residue and isn’t quite as durable or waterproof for long-term trail use. However, it’s widely available and incredibly strong.
- Prepare: Clean and dry the area as best you can.
- Cut to Size: Cut two pieces of duct tape, each extending at least an inch beyond the tear on all sides. Rounding the corners can help prevent peeling.
- Apply: Apply one piece to the inside of the fly and the other to the outside, sandwiching the torn fabric.
- Press Firmly: Ensure good adhesion by pressing out air bubbles.
3. The Needle and Thread (For Structural Integrity or Larger Tears)
For large, flapping tears that tape alone can’t adequately secure, or if you need to reinforce a taped repair, a quick stitch job can be very helpful.
- Bring Edges Together: Overlap the torn edges slightly.
- Temporary Hold: Use safety pins to hold the edges together while you stitch.
- Basic Stitch: Use a simple running stitch or a whip stitch to sew the edges together. Don’t worry about neatness; focus on creating a strong, functional seam.
- Reinforce: Once stitched, you can apply Tenacious Tape or duct tape over the stitched area for added waterproofing and durability.
4. Safety Pins (Temporary, Small Fixes)
For very small holes or to temporarily secure a flapping piece of fabric, safety pins can provide a quick, immediate solution. These are best used in conjunction with tape for a more robust fix.
Post-Repair Considerations
Once your tent fly is patched up, keep an eye on the repair, especially during adverse weather. The trailside fix is temporary. Upon returning home, properly clean the tent fly and perform a more permanent repair using dedicated tent patch kits, seam sealer, or even professional repair services. Practicing these quick fixes at home can also boost your confidence for when you inevitably face a gear emergency on the trail.
Being prepared for a torn tent fly ensures that a minor mishap doesn’t derail your entire outdoor adventure. With the right tools and a little know-how, you can quickly patch things up and continue enjoying the wilderness.