The Foundation of Comfort: Why Your Hip Belt Matters Most
When it comes to carrying a backpack, especially for long hikes or multi-day treks, the hip belt isn’t just an accessory—it’s the cornerstone of comfort and efficiency. Many new hikers mistakenly rely on their shoulder straps to bear the brunt of the load, leading to sore shoulders, neck pain, and an overall miserable experience. The truth is, 70-80% of your backpack’s weight should rest comfortably on your hips.
Your hips and legs are far better equipped to carry heavy loads than your shoulders. A well-adjusted hip belt effectively transfers the pack’s weight to your body’s stronger muscles, freeing your shoulders and allowing for better posture, increased stamina, and a more enjoyable journey. Mastering this adjustment is perhaps the single most important step in achieving optimal backpack fit.
Step-by-Step Guide to Hip Belt Adjustment for Maximum Support
Achieving the perfect hip belt fit involves a sequence of steps. Follow these instructions with your pack loaded with the weight you intend to carry, as an empty pack will fit differently.
1. Loosen All Straps
Begin by loosening all the straps on your backpack: shoulder straps, load lifters, sternum strap, and most importantly, the hip belt. This gives you a fresh starting point to build your fit from the ground up.
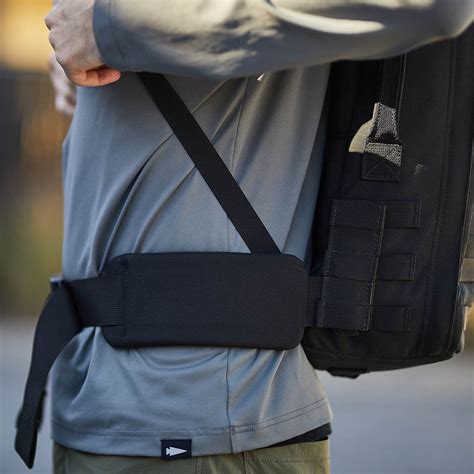
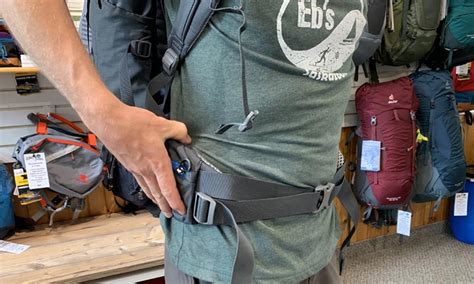
2. Position the Hip Belt Correctly
The hip belt should sit directly over your iliac crests – the top of your hip bones. When you tighten the belt, the padding should cup your hips, with the center of the belt roughly aligning with your belly button. It should feel like the pack is resting on a shelf formed by your hips, not your lower back or stomach.
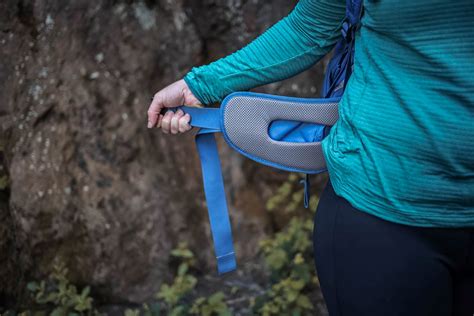
3. Cinch Down the Hip Belt
Now, pull the hip belt straps until they are snug and secure. The belt should feel tight enough that it won’t slip down your hips when you take your hands off it, but not so tight that it restricts your breathing or causes discomfort. There should be no significant gaps between the belt and your body. Most hip belts are designed to be tightened by pulling straps forward, making it easier to get a firm fit.
4. Adjust Shoulder Straps
Once the hip belt is secure, gently pull down on your shoulder straps until they are snug against your shoulders. The goal here is to keep the pack from falling backward, not to bear weight. There should be no significant gap between the top of your shoulder and the shoulder strap, but you shouldn’t feel any pinching or heavy pressure.
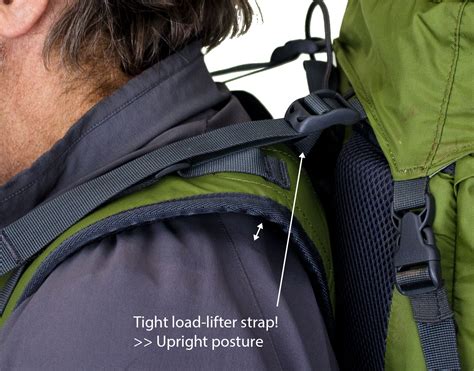
5. Fine-Tune Load Lifters
Load lifter straps are typically located at the top of your shoulder straps, connecting to the upper portion of the backpack. Pull these forward and down at roughly a 45-degree angle. This action pulls the top of your pack closer to your body, preventing it from leaning back and helping to distribute weight more evenly. Adjust them until the pack feels stable and close to your back, but not so tight that they lift the shoulder straps off your shoulders.
6. Secure the Sternum Strap (Optional but Recommended)
The sternum strap connects the two shoulder straps across your chest. Adjust its height so it sits comfortably across your sternum (breastbone), usually a few inches below your collarbones. Cinch it lightly to pull the shoulder straps inward, preventing them from splaying out and improving stability, especially on uneven terrain. Don’t overtighten; it’s there for stability, not to bear weight.
Common Hip Belt Adjustment Mistakes to Avoid
- Too Loose: If your hip belt is too loose, the weight will shift back to your shoulders, defeating its purpose.
- Too High or Too Low: If the belt is too high, it might restrict movement or dig into your ribs. Too low, and it won’t effectively transfer weight to your iliac crests.
- Overtightening: While snug is good, overtightening can cause discomfort, numbness, or restrict breathing.
- Relying on Shoulders: Remember, the shoulders are for stability, the hips are for weight bearing.
Signs of a Perfectly Fitted Hip Belt
You’ll know your hip belt is adjusted correctly when:
- Most of the pack’s weight feels like it’s resting squarely on your hips.
- Your shoulders feel relatively free, with no significant downward pressure or strain.
- The hip belt padding wraps evenly around your hips without pinching or gapping.
- You can move freely without the pack swaying excessively or feeling unbalanced.
- There are no hot spots, rubbing, or discomfort around your waist or lower back.
When to Re-Adjust Your Hip Belt
A good fit isn’t a ‘set it and forget it’ situation. You might need to make minor adjustments throughout your journey:
- Changes in Terrain: Uphill climbs might benefit from slight loosening of shoulder straps, downhill from a tighter sternum strap.
- Changes in Load: As you eat food or drink water, your pack’s weight and center of gravity will change.
- After a Break: Sometimes taking the pack off and putting it back on requires a quick re-cinch.
Conclusion
Mastering the art of hip belt adjustment is a game-changer for anyone who carries a backpack. By taking the time to properly position and cinch this crucial component, you unlock a world of comfort, stability, and endurance on the trail. Don’t underestimate its power; a well-adjusted hip belt is your best friend for an enjoyable and pain-free adventure.