
Why Proper Pack Fit is Non-Negotiable for Heavy Loads
Hiking with a heavy pack can quickly turn an enjoyable adventure into a grueling ordeal if your equipment isn’t properly fitted. When carrying substantial weight – be it for multi-day treks, winter expeditions, or carrying specialized gear – the difference between comfort and agony often boils down to how well your backpack integrates with your body. A correctly fitted pack distributes weight efficiently, primarily onto your hips, preserving your shoulders and back from undue strain. This not only enhances your endurance but also reduces the risk of chafing, sores, and potential long-term injuries.

Key Components of a Perfect Fit
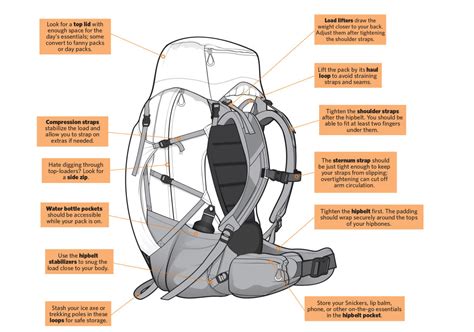
Understanding the critical adjustment points of a backpack is the first step toward achieving an optimal fit. Each element plays a crucial role in load distribution and stability.
Torso Length: The Foundation
This is arguably the most critical measurement. A pack’s torso length must match your own. Most modern packs come in various torso sizes (e.g., S, M, L) or have adjustable torso lengths. If your pack’s torso length is wrong, no amount of strap adjustment will make it comfortable.
The Hip Belt: Your Primary Weight Bearer
Approximately 70-80% of a heavy pack’s weight should rest on your hips. The hip belt should sit snugly over the top of your hip bones (iliac crests), not above or below. A well-padded and anatomically shaped hip belt is essential for comfort when carrying significant weight.
Shoulder Straps: Stabilizers, Not Load Bearers
Your shoulder straps should cradle your shoulders comfortably, following the contour of your traps without creating large gaps or digging in excessively. Their primary role is to pull the pack into your back and stabilize the load, not to carry its majority.
Load Lifters: Bringing the Pack Closer
These straps connect the top of the shoulder straps to the top of the pack body. When tightened, they pull the top of the pack closer to your body, bringing the load’s center of gravity forward and upward. This prevents the pack from sagging backward and creating leverage that can pull you off balance.
Sternum Strap: Enhancing Shoulder Comfort
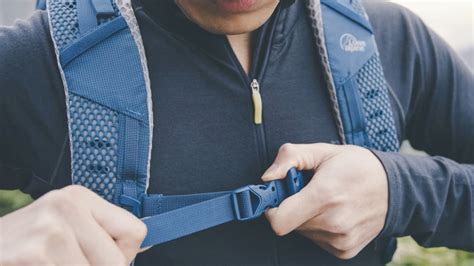
Connecting the two shoulder straps across your chest, the sternum strap pulls them inward, preventing them from splaying out and chafing your armpits. It also helps stabilize the load and distribute pressure across your chest.
Step-by-Step Guide to Fitting Your Pack
Achieving the best fit requires a systematic approach. It’s always best to do this with a realistic load in the pack (e.g., 20-30 lbs for testing heavy load fit).
-
Measure Your Torso Length
Have a friend measure from the C7 vertebra (the bony knob at the base of your neck when you tilt your head down) down to a line level with the top of your hip bones. This measurement will guide your pack size selection.
-
Loosen All Straps
Start with a blank slate. Loosen your hip belt, shoulder straps, load lifters, and sternum strap completely.
-
Position and Tighten the Hip Belt
Place the pack on your back and center the hip belt so its top edge sits directly over the top of your hip bones. Cinch the hip belt firmly, but comfortably. It should feel secure, transferring most of the pack’s weight directly to your hips.
-
Adjust Shoulder Straps
Pull the shoulder straps down and back until they snug up against your shoulders. You should feel comfortable contact, but not significant weight on your shoulders. The anchor points of the shoulder straps (where they connect to the pack) should be about 1-2 inches below the top of your shoulders.
-
Engage Load Lifters
Pull the load lifter straps forward until they are taut. This will pull the top of the pack closer to your body. Aim for an angle of approximately 45 degrees between the load lifter strap and the top of the shoulder strap.
-
Fasten the Sternum Strap
Adjust the height of the sternum strap so it crosses your chest comfortably, typically about 2 inches below your collarbone. Fasten and tighten it just enough to pull the shoulder straps inward without restricting your breathing.
-
Check and Refine
Walk around with the pack. Does it feel stable? Is the weight primarily on your hips? Do you have full range of motion? Fine-tune each strap until the pack feels like an extension of your body.
Common Fitting Mistakes to Avoid
- Hip belt too loose or too high/low: If the hip belt isn’t correctly positioned, your shoulders will bear too much weight, leading to discomfort.
- Shoulder straps too tight: This indicates the hip belt isn’t doing its job, putting unnecessary pressure on your shoulders and potentially restricting circulation.
- Load lifters not engaged: A loose top section of the pack will pull backward, throwing off your balance and making the pack feel heavier than it is.
- Ignoring your torso length: No amount of adjustment can compensate for a pack that’s fundamentally the wrong size for your body.
Conclusion: Practice Makes Perfect
Finding the best pack fit for heavy loads is a personalized process. While these guidelines provide a strong starting point, every body is different, and every pack has its quirks. Don’t be afraid to experiment with adjustments, and always try on packs in-store with weight if possible. Consider seeking professional assistance from outdoor gear specialists, who can provide expert advice and help you dial in the perfect fit. With a properly fitted pack, you’ll be able to carry heavy loads more comfortably, efficiently, and safely, allowing you to fully enjoy the challenges and rewards of the trail.