There’s nothing quite like the sudden chill of a damp shoulder when your rain jacket fails you miles from civilization. A torn rain jacket can quickly turn a pleasant outdoor excursion into a miserable, and potentially dangerous, experience. Knowing how to perform a quick, effective field repair is a vital skill for any adventurer, ensuring you stay dry and your spirits remain high, even when the weather takes an unexpected turn.
Why Field Repair Matters
Beyond comfort, a compromised rain jacket can lead to hypothermia, especially in colder conditions. A quick patch-up can buy you time to reach shelter or complete your trip without further exposure. It’s about preparedness, resourcefulness, and safeguarding your well-being in unpredictable environments.

Assembling Your Field Repair Arsenal
A lightweight, compact repair kit is an indispensable addition to your pack. For rain jacket repair, the key components are:
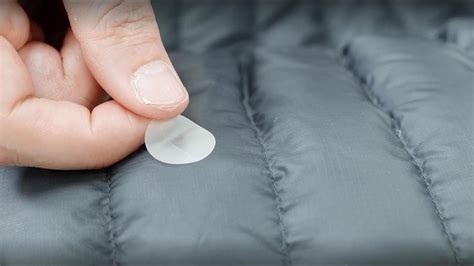
- Tenacious Tape or Gear Aid Patches: These are the gold standard. They are strong, waterproof, and adhere well to most technical fabrics. Pre-cut patches are convenient.
- Alcohol Wipes: Crucial for cleaning the repair area, ensuring optimal adhesion. Small, individually wrapped wipes are perfect.
- Small Scissors or Knife: To trim frayed edges or cut patch material (if not pre-cut).
- Needle and Thread: For larger, more complex tears where a patch alone won’t suffice or as a temporary measure before patching. Opt for a heavy-duty, synthetic thread.
The Step-by-Step Field Repair Process
1. Assess the Damage
Before you begin, fully examine the tear. Is it a small puncture, a clean rip, or a jagged gash? Understanding the nature of the damage will help you choose the best repair method.
2. Prepare the Area
Lay the jacket flat on a clean, dry surface. Use an alcohol wipe to thoroughly clean around the tear, extending at least an inch beyond its edges. This removes dirt, oils, and moisture, which are enemies of good adhesion. Allow the area to dry completely. Trim any loose or frayed threads around the tear with your scissors.
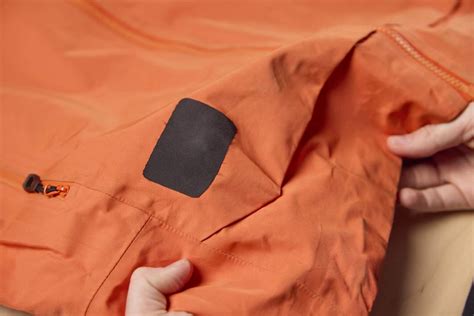
3. For Small Tears and Punctures (Patching)
This is the most common and easiest repair. Cut a patch (or use a pre-cut one) that extends at least half an inch beyond all edges of the tear. For better durability and to prevent peeling, round the corners of your patch if they are square. Peel off the backing and carefully apply the patch over the tear, ensuring it’s smooth and flat. Press down firmly from the center outwards, expelling any air bubbles. Apply pressure for a few minutes. If possible, apply a second patch to the inside of the jacket for extra reinforcement, mirroring the first one.
4. For Larger or Complex Tears (Stitch and Patch)
If the tear is large or runs along a seam, a simple patch might not hold sufficiently. In such cases, you’ll need to use your needle and thread first. Carefully stitch the edges of the tear together, using a simple running stitch or a whipstitch. This isn’t meant to be perfectly waterproof, but rather to hold the fabric together and provide a stable base for your patch. Once stitched, follow the patching steps above, ensuring the patch completely covers your stitches and extends well beyond the tear on all sides.
Tips for Maximizing Durability in the Field
- Warmth Helps: If you can warm the repair area slightly (e.g., placing the jacket in the sun for a few minutes, or using body heat), it can improve patch adhesion.
- Pressure is Key: The more firm, sustained pressure you apply to the patch, the better it will bond. Use a water bottle, a smooth rock, or your palm.
- Immediate Action: Don’t wait for a small tear to become a large one. Repair it as soon as you notice it.
- Home Follow-up: Field repairs are often temporary. Once home, consider a more permanent repair using seam sealants, iron-on patches, or professional repair services for critical gear.
Prevention is the Best Repair
While field repair skills are invaluable, prevention is always better. Be mindful of your surroundings – sharp branches, abrasive rocks, and even zipper snags can all cause damage. Store your jacket carefully and clean it according to manufacturer instructions to maintain its integrity.
Conclusion
A torn rain jacket doesn’t have to spell the end of your adventure. With a small, well-stocked repair kit and the knowledge to use it, you can confidently tackle unexpected gear failures in the field. Mastering these essential repair techniques empowers you to stay dry, comfortable, and safe, no matter what the wilderness throws your way.