Old hiking boots, despite their worn appearance, often have plenty of life left in them, especially if the soles and structure are still sound. One of the most common issues with aging boots is the degradation of their waterproof capabilities. Thankfully, restoring this crucial function is a straightforward process that can save you money and keep your feet comfortable and dry on the trails.
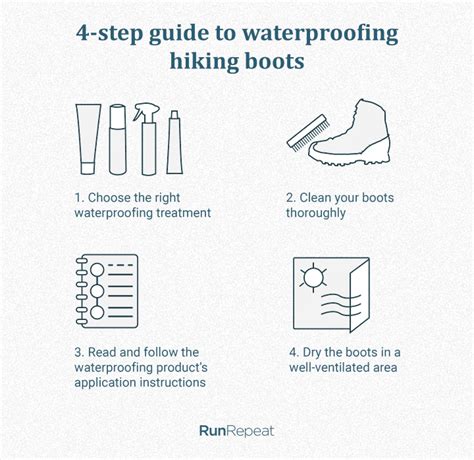
1. Assess Your Boots and Prepare Them
Before you begin the waterproofing process, thoroughly inspect your boots. Check for any major cracks in the leather, tears in synthetic fabrics, or significant sole separation. While waterproofing can help with minor wear, major damage might require professional repair or boot replacement. Assuming your boots are structurally sound, the next step is preparation.
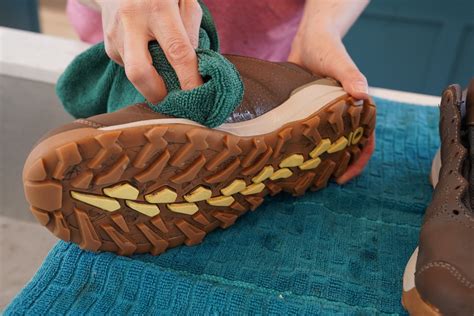
Preparation is key to effective waterproofing. Start by removing the laces and insoles. Knock off any loose dirt or mud, then use a stiff brush and a mild soap (like saddle soap or a dedicated boot cleaner) with warm water to clean the entire boot, paying special attention to seams and crevices. Rinse them thoroughly to remove all soap residue. Allow the boots to air dry completely in a well-ventilated area, away from direct heat or sunlight, as heat can damage materials like leather.
2. Select the Right Waterproofing Product
The type of waterproofing product you choose depends heavily on your boot’s material. There are generally two main categories:
- Wax-based treatments: Ideal for full-grain leather boots. These waxes (often a blend of beeswax, paraffin, and other oils) condition the leather while creating a water-repellent barrier. They can darken lighter leathers and may slightly reduce breathability.
- Spray-on or brush-on treatments: Best for suede, nubuck, synthetic fabrics, or boots with a mix of materials. These typically contain fluoropolymers or silicones that bond to the fibers, forming a water-repellent layer without significantly altering the appearance or breathability.
Always read the product’s instructions carefully to ensure it’s compatible with your boot material. Some products are designed for specific materials like Gore-Tex or eVent, which require treatments that don’t clog the membrane’s pores, maintaining breathability.
3. The Application Process
Once your boots are clean and dry, it’s time to apply the waterproofing treatment. Work in a well-ventilated area, and consider wearing gloves to protect your hands.
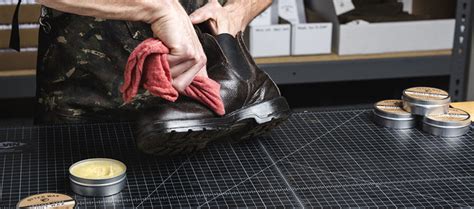
For Wax-based Treatments (Leather Boots):
Using a cloth or your fingers, apply a generous layer of wax to the entire surface of the leather, working it deep into the material. Pay extra attention to seams, stitching, and areas that flex, as these are common points for water entry. You can use a hairdryer on a low setting to gently warm the leather, helping the wax penetrate more deeply. Once applied, use a clean cloth to buff off any excess, ensuring an even finish.
For Spray-on or Brush-on Treatments (Synthetic, Suede, Nubuck):
If using a spray, hold the can the recommended distance from the boot (usually 6-8 inches) and apply an even, liberal coat. For brush-on liquids, apply with a sponge or brush. Ensure all areas are covered, especially around seams and the tongue. Avoid over-saturating. Many products recommend a second coat after the first has partially dried, but always follow the specific product instructions.
4. Drying and Curing for Maximum Protection
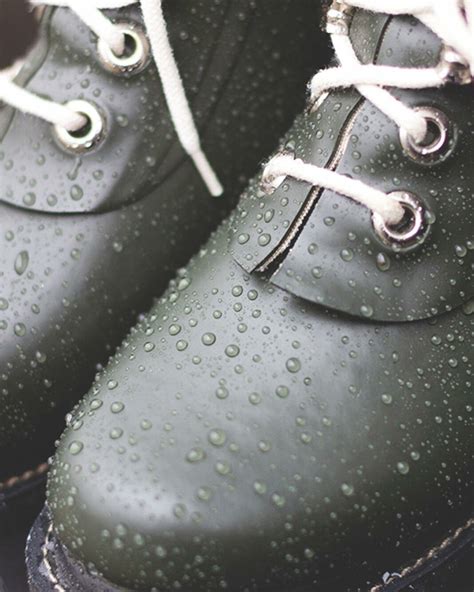
After application, the boots need to dry and cure properly to allow the waterproofing treatment to bond with the material. This step is crucial for long-lasting protection.
Place your boots in a cool, dry, and well-ventilated area. Avoid direct sunlight or artificial heat sources like radiators, as these can cause leather to crack and damage synthetic materials. Drying times can vary significantly based on the product and environmental conditions, ranging from a few hours to a full 24-48 hours. Patience here pays off. Once completely dry, reinsert your insoles and laces.

5. Maintain Your Waterproofed Boots
Waterproofing isn’t a one-time fix; it’s an ongoing maintenance task. To prolong the life of your freshly waterproofed boots and ensure continued protection:
- Clean Regularly: After each hike, brush off dirt and mud. A quick clean prevents abrasive particles from wearing down the waterproofing.
- Reapply as Needed: The frequency of reapplication depends on how often you use your boots and the conditions you hike in. A good test is to sprinkle water on the boots; if it soaks in rather than beading up, it’s time to reapply.
- Proper Storage: Store your boots in a cool, dry place away from direct sunlight and extreme temperatures.
By following these steps, you can effectively waterproof your old hiking boots, ensuring they remain a reliable and comfortable companion on many more adventures to come. Not only will you extend their lifespan, but you’ll also keep your feet dry and happy, no matter what the weather throws at you.