Understanding Hip Pain on the Trail
Long treks are exhilarating, but hip pain can quickly turn a dream hike into a grueling ordeal. Often, this discomfort isn’t just about your body; it’s a direct result of how your backpack is interacting with it. The good news is that most hip pain related to backpacking can be mitigated, if not entirely eliminated, by understanding and correctly adjusting your pack.
The Crucial Role of Your Hip Belt
Your hip belt is not just a fancy accessory; it’s the foundation of a properly fitted backpack. A well-adjusted hip belt should bear 70-80% of your pack’s weight, transferring it from your shoulders to your stronger leg and hip muscles. When this is not done correctly, your shoulders and lower back take on excessive strain, leading to a cascade of discomfort, including hip pain.
Initial Setup: A Clean Slate for Adjustment
Before you begin fine-tuning, load your pack with the typical weight you’d carry on a trek. This provides a realistic feel for the adjustment. Once loaded, loosen all straps on your backpack: the hip belt, shoulder straps, load lifters, sternum strap, and any side compression straps. This ensures you start from a neutral position.
Step-by-Step Adjustment for Hip Pain Relief
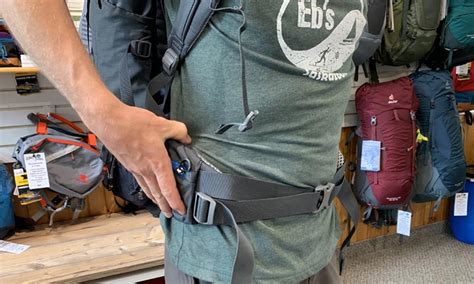
1. The Hip Belt: Your Primary Load Bearer
Put on your backpack and position the hip belt so that the padded section sits centered over your iliac crest (the top of your hip bones). The top edge of the hip belt should be about an inch above your hip bones, with your hip bone sitting comfortably within the padding. Cinch the hip belt firmly, but not uncomfortably tight. It should feel secure, like a hug around your hips, preventing the pack from shifting side-to-side.
2. Shoulder Straps: Snug, Not Squeezing
After securing the hip belt, pull down on your shoulder straps to snug the pack against your back. There should be no gaps between your shoulders and the straps, but they shouldn’t feel like they’re digging in or carrying the majority of the weight. Aim for about 20-30% of the pack’s weight on your shoulders.
3. Load Lifters: Bringing the Pack Closer
These straps are located at the top of your shoulder straps, connecting to the upper part of the pack. Pull them forward and down at about a 45-degree angle. This action pulls the top of your pack closer to your body, distributing the weight more evenly and preventing the pack from swaying backward. Adjust them until the pack feels stable and close to your back.
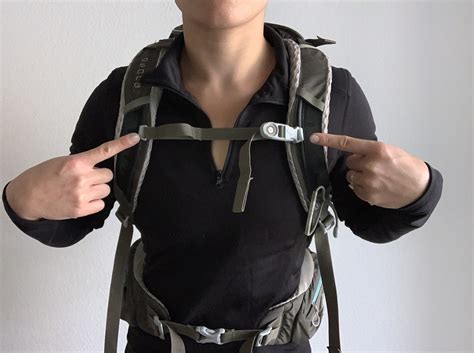
4. Sternum Strap: Stabilizing the Load
The sternum strap, located across your chest, primarily prevents the shoulder straps from slipping off and helps stabilize the pack. Adjust its height so it sits comfortably across your sternum (avoiding your collarbones or stomach) and tighten it just enough to pull the shoulder straps inward. It shouldn’t restrict your breathing.
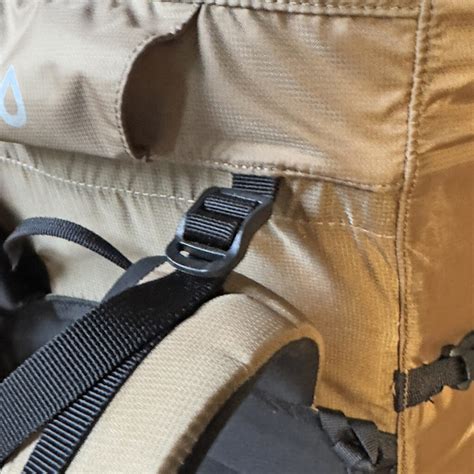
5. Stabilizer Straps: Fine-Tuning the Fit
Many packs have smaller straps on the hip belt that pull the bottom of the pack closer to your body. These are often called hip belt stabilizers or load stabilizers. Gently tighten these to further secure the pack to your hips, minimizing side-to-side movement. Don’t overtighten, as this can create pressure points.
Beyond Straps: Packing Smart for Hip Comfort
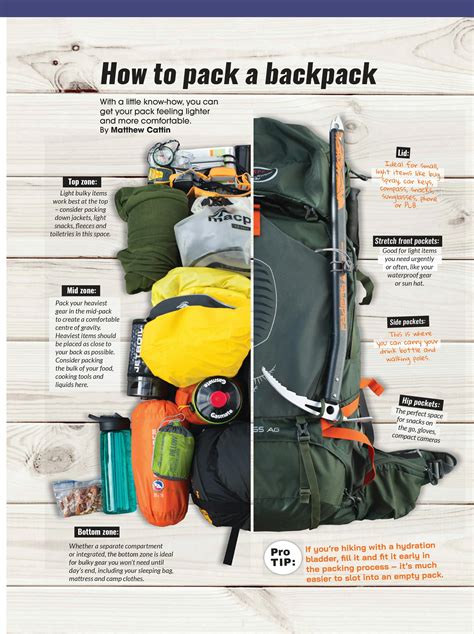
Even with perfect strap adjustment, poor packing can lead to hip pain. Place your heaviest items (water, food, stove, fuel) close to your back and centered between your shoulder blades and hips. This keeps the center of gravity high and tight, preventing the pack from pulling you backward or shifting awkwardly.
On-Trail Adjustments and Listening to Your Body
A static adjustment won’t work for an entire trek. As you hike, your body changes, the terrain changes, and your pack’s contents shift. Make micro-adjustments to your straps throughout the day. Loosen the hip belt slightly on ascents to allow for more mobility, and tighten it on descents for better control. If you feel a hotspot or discomfort, stop and re-evaluate your fit. Don’t push through pain.
Common Mistakes to Avoid
- Hip Belt Too Loose or Low: This puts all the weight on your shoulders and lower back.
- Overtightening Shoulder Straps: They should just hold the pack snug, not bear the primary load.
- Ignoring Load Lifters: Neglecting these can cause the pack to pull away from your body.
- Improper Packing: Heavy items at the bottom or far from your back create leverage that pulls you off balance.
- Skipping Practice Hikes: Always do short hikes with your loaded pack before a long trek to fine-tune adjustments.
Conclusion: Practice Makes Perfect (and Pain-Free)
Mastering backpack adjustment is a skill that improves with practice. Spend time with your pack at home, experimenting with different loads and adjustments. Go on short training hikes to test your fit. By taking the time to properly adjust your backpack and listen to your body, you can significantly reduce the risk of hip pain, allowing you to fully enjoy the beauty and challenge of your long treks.